No products in the cart.
Listen to the automated audio version of this article:
Packing for a photography trip is never easy. It may be more straightforward if it’s only for a weekend rather than a few months. But it’s still a matter of making the right choices.
Now it’s the Summer holidays season and I’m doing lots of packing and unpacking myself. For example, this weekend is a bank holiday here in the UK, and I’ll be visiting places. So, I thought it would be the perfect time to write down something on this topic…
One of my first videos on my YouTube channel was about my camera bag content. But it’s time to make a new one because things have changed. Maybe not too much, but they have. Including the bag (which will be the subject of another future video, long overdue).
One thing that has changed is that, even though I have purchased more gear, I learned how to pack less. I try to pack a minimal setup as much as possible. I’m also getting older, so a lighter bag on my back is always welcome.
And here, I will share with you 3 tips that help me achieve this every time.
1. Get a Good Bag
I just mentioned I do have a new bag. And that is an important element of any setup. A good camera bag is obviously important for travel, but not many photographers understand the fundamental role it plays.
Safety first
In my videos, I sometimes mention that I may travel to rough destinations. And trust me: in such places, you don’t want to flash your gear to just about everyone. Particularly if you travel solo. And something you may overlook is that your bag is also part of your gear. If you go around with a Peak Design backpack, a LowePro, Shimoda, Manfrotto or any brand remotely hinting at Photography, you are pretty much telling everyone you carry expensive gear. And that makes you a target.
My friend Roman was once approached by a stranger who started asking him questions on the assumption that he was a photographer because he had a Peak Design bag. Don’t think thieves are not that savvy: all they need to identify you nowadays is to watch a gear review channel on YouTube on a smartphone.
Of course, a camera backpack is better suited to protect your gear when inside the bag. And it may have features that you need to make your job easier. So it’s mainly a matter of deciding what is important to you. I will link further down a few options that I would recommend, for both camera and travel bags.
Important considerations
Having said that, a good camera/travel camera backpack should mainly do the following:
- Hold and protect your gear
- Provide space for accessories
- Distribute the weight of your content
I had never realised the difference this last point makes until I got myself the first Peak Design backpack. In itself, that was already heavy when empty, so I was worried it would feel bad on my shoulders. But then, even when fully packed, I could carry it around for a full day of shooting and never feel tired or sore.
Since then, this has become probably the main feature I look for in a bag. And the one I always talk about first when people ask me about bag recommendations.
When it comes to packing for a photography trip, there is a main difference between camera bags and travel bags.
Camera bags are designed with photographers in mind, so they provide you with dedicated spaces to store your gear orderly and safely. They also usually offer a way to easily access what you need. For example, via a zipped compartment that you can quickly open to get your camera and shoot before your scene has changed and the photo is missed.
Travel bags are not tailored to the photographers’ needs, but in recent times many companies have started offering dedicated accessories. For example, you can now often buy what is called a “camera cube”, which mimics the features of a camera bag in a smaller format that fits a generic bag. It’s a setup that may slow you down a little, but is certainly more inconspicuous.
I say, generically, “bag”, as this is true for backpacks, slings, and even carrying cases.
My bag recommendations
Bear in mind I only talk about bags I have tried myself. I cannot recommend something I know nothing about, even if I watched YouTube videos praising this backpack or that sling bag.
Travel bags
My current backpack of choice is a travel one. I guess you saw that coming. And it’s the Tropicfeel Nest. I have been thinking about making a dedicated video a while ago, and it’s now long overdue. Suffice it to say it ticks all the boxes and has a couple clever features too, particularly about expanding the storage. It’s big enough to hold a tripod inside and offers a camera cube accessory and a compressing cube for your clothes if needed.
Until I publish my own video, watch the official one I took from their website:
Tropicfeel also offers a larger backpack that works very well as a cabin bag for when you take a plane, the Shell. It is a fantastic option to travel with. And the one I use if I only carry one bag with me when I fly. Only a tad less convenient to take out with you on a shooting day, for its size.
Before switching to Tropicfeel, I used a couple of backpacks from Osprey (here is my last one). They offer a range of bags that are extremely good travel companions, and I was able to make them suit my needs. But they are less flexible to be used for Photography. Which, in turn, makes them even more inconspicuous.
Camera bags
Now, camera bags. There are so many options it can be overwhelming to pick one.
Personally, I’ve always been fond of the products by Peak Design. Ever since I funded their first backpack on Kickstarter. They integrate clever design features, are well-built and offer fantastic weight distribution. The Everyday 20L is extremely popular and for good reasons. The Sling is also a perfect choice for a day out in the street with minimal gear.
Shimoda and LowePro are great contenders. From the 18-20L size to the 35-40L, you can rest assured you are purchasing a backpack that is very well built and designed with travel photographers in mind. The ones I owned are the Shimoda Explore 25L and the LowePro Flipside 400, both highly recommended.
If you clicked the links, I’m sure you noticed it already: camera bags are specialistic; therefore the good ones are expensive.
A small everyday bag I recently saw on my friend Sean’s back is the Wotancraft Pilot 10L. Even though it’s a camera messenger bag, it doesn’t scream photography gear. It also looks very cool, which can’t harm :)
2. Keep. It. Simple.
Oh my. How often have I carried around an extra lens only because “it could be useful”. “What if I need that?”… I’m sure we have all done it. And probably never used half of that extra “useful” gear. When packing for a photography trip, bringing too much gear is a common mistake. Having many options feels good but ultimately places a heavy weight on your back. And it could even get in the way of your photography: options mean decisions and you could be stuck trying to make the right one.
Simple is often better.

The best setup for you is something that you learn with experience. The more you take your gear out with you, the more you figure out what it is that you use the most in any given situation. And what compromises you are willing to accept to reduce weight and size.
Does this mean I have no need for the dozen other lenses I own? Of course not. I may even take them with me sometimes. It’s a matter of being intentional with the gear I take with me and knowing what I really need, not what I may potentially have a use for, if the stars align.
Now, I say lenses, but this is a valid point for any piece of gear you own. Bodies, lenses, accessories, etc.
It does help to establish a clear idea of what you plan to shoot on your trip. But of course, you may not know in advance all that you will encounter, so you must make smart choices.
Take what you need. Leave the rest at home.
I’m not telling you to miss a photo. I’m telling you to make the right choices. The ones that allow you to take the photos you want without ruining your trip because you feel sore and exhausted already at Midday or ruining your health because your back is in constant pain from the weight.
3. Be Flexible
The third tip I’m giving you about packing for a photography trip is a follow-up to the previous one.
For example, I know that for my Street Photography, all I really need is the Fujifilm 33mm F/1.4. And if I need to further reduce the size, the 35mm F/2 is a more than adequate replacement.
If I go away for a weekend and play the tourist, I’m perfectly OK with just 2 zoom lenses: the 18-55mm kit lens and the 70-300mm. Perhaps with the addition of a small teleconverter to extend the telephoto. Together, they take the space of a water bottle, but they give me an impressive focal range of 18-600mm (with a negligible gap between 55 and 70mm).
And if I want to go wider, the Samyang 12mm F/2 is so tiny and light that I can easily include it.
Perhaps you love your 90mm F/2 for portraits (in the Fujifilm range, it’s my absolute favourite lens), but do you really need to take it with you on the trip? Could you do the same with the 70-300mm, even if you lose a couple F-stops, but then have the flexibility to shoot landscape with the same lens? Or get a lighter portrait prime like the Samyang 75mm I reviewed here?
Do you take the 33mm F/1.4 because it’s just unbelievably good, or can you get away with the 35mm F/2 and add the 23mm F/2 (or the 50mm F/2) to have more options? Two lenses for the same size and weight of one…
Prime lenses may yield better results (sometimes far better). But from a travel perspective, I always favour flexibility. Particularly with Fujifilm, some zoom lenses are so good you don’t really notice the difference.
Then, of course, the main culprit: the tripod.
This is extremely subjective. Not everybody needs to bring a tripod. But if something can take space and add weight, the tripod will definitely do. So, do you really really need it? Can you go with a smaller one? Can you afford carbon fibre rather than aluminium? Are there other viable solutions?
These are the questions I ask myself every time I pack.
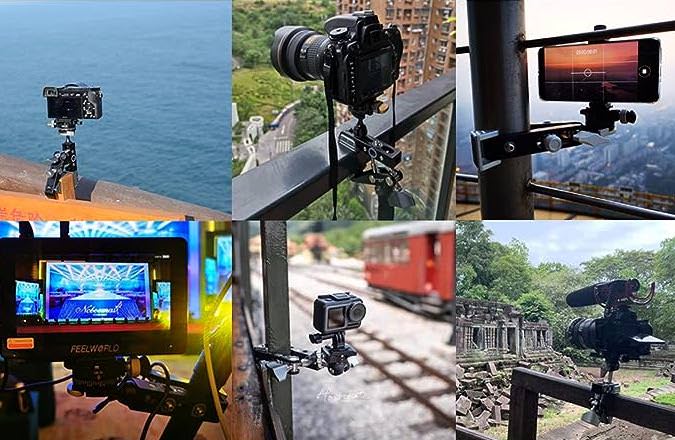
For example, you rarely see me around with a tripod, here in London: all I bring is a clamp (with a small ball head) that I can attach to almost any surface or a mini tripod (even the Platypod) for flat ones. If I don’t know if I’ll be able to shoot a sunset or a timelapse, because of the ever-changing weather, there is no point in making my back suffer by carrying around a heavy tripod all day.
This could be a topic for a YouTube video on my channel, and maybe it will be. A few months ago, I started filming a Travel Photography course that is still unfinished, so perhaps I could add these tips there. We’ll see.
In the meantime, enjoy your holidays and take photos. Have a jolly good time!
Cheers!