No products in the cart.
Listen to the automated audio version of this article:
This in-depth guide tackles the complexities of sharpening Fujifilm RAW files in Lightroom. It delves into the underlying causes of the challenges and explores various solutions, including a step-by-step guide to achieving optimal sharpening results.
Sharpening Fujifilm RAW files in Lightroom has long been a challenge for photographers. The issue often leads to frustrating results, prompting some to switch to alternative software or even abandon Lightroom altogether.
I’ve experimented with various solutions over the years. And every time I felt it was the correct one, I found later that I needed to edit my photos again.
It’s never really been an issue with images to post on social media. With small size and compression, most problems are not there for viewers to see. But it is an entirely different matter with prints. Even nightmarish with large ones.
The worms
You often hear Fujifilm photographers complain about the “worms”. When you pixel-peep a Fujifilm RAW file in Lightroom (mind you, only with specific cameras – more on that later), you can see some strange artefacts that look like a nest of worms. They could be spaghetti, but I suppose people are so upset that they refuse to associate it with something nice. And maybe they’re shorter than spaghetti. Ok, fine.
This is not a problem on the Fujifilm side. It seems to only happen in Lightroom, and, as I hinted above, other apps seem to handle it much better. But it is caused by the hardware on some Fujifilm cameras being “different”.
Some technical stuff for fellow nerds
Sharpening
First of all, let’s understand Sharpening. This is already a particularly confusing topic indeed.
The common understanding is that you shouldn’t sharpen until you have made all your edits. While this makes sense in general, with Lightroom and other non-destructive editing apps, it does not apply. Unlike many programs, the order of your Lightroom adjustments has no effect on the final image whatsoever.
Knowing the different sharpening steps does, though. They are:
- Capture Sharpening
- Local or Creative Sharpening
- Output Sharpening
Capture Sharpening…
is often done automatically by your software when opening your file. This is the main reason people say one software handles files better than the other. It’s simply because it is more effective in doing this first step (when it’s even done). It’s a way to overcome the lack of sharpness of RAW files due to the technical limitations of digital cameras. And it’s what this article is focusing on.
Local Sharpening…
(or Creative Sharpening, as it’s often called) is what a photographer decides to apply to the image, generally or locally, to enhance aspects of it. It’s what you do with your edits when you change Contrast, Clarity, Texture, etc.
Output Sharpening…
is the end process before sending an image to the Web or print. This, again, is designed to offset technical problems with resizing, or image compression, or printer-specific issues.
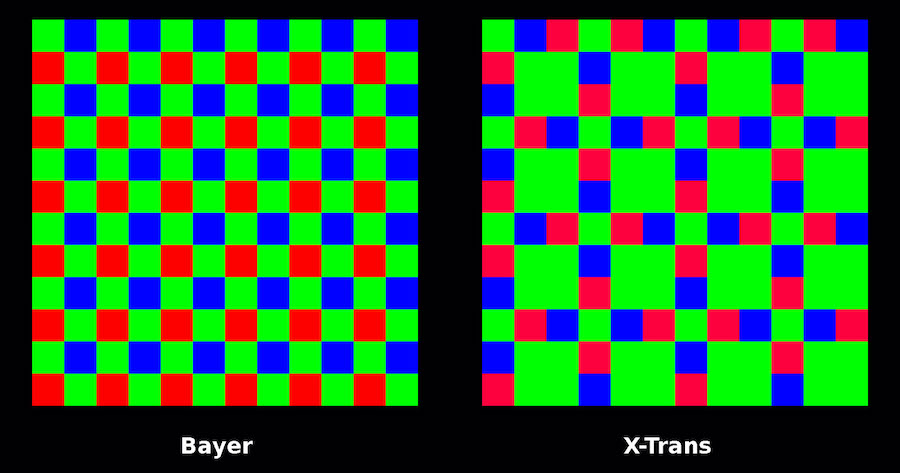
The Fujifilm X-Trans sensor
High-end Fujifilm cameras use a proprietary technology for their sensors called X-Trans. The other models, and most cameras from other brands, use a Bayer sensor originally developed by Kodak. Lightroom is tuned to the latter, and for reasons known to them only, Adobe seems to refuse (or is unable) to apply a patch for X-Trans.
The difference is in the coloured pixels distribution pattern on the sensor. Bayer sensors feature a 2×2 pattern of pixels with double areas of green, while X-trans features a 6×6 configuration. Many, myself included, praise the colours you get out of a Fujifilm camera, so it seems this pattern has its advantages indeed. Fujifilm also claims this eliminates the need for a low-pass filter to cancel moiré and provides more detail (although this may be subject to camera orientation).
Knowing this fixed pattern, one would assume that it’s only a matter of making the software understand it. But it hasn’t happened with Lightroom so far. Adobe has recently added a feature that should address this, with the Enhance Details functionality (accessible via right-clicking on an image).
This indeed helps sharpen Fujifilm RAW files to an extent. But the results are a bit random, forcing you to create a duplicate of the image in the form of a new DNG file. And a large one since this is not compressed, which is less than ideal for the space it takes. Also, your computer might not have this enabled as it requires a dedicated compatible GPU.
External solutions (to use with Lightroom)
You’ll encounter the same drive space issue if you use external software to sharpen your RAW files and then go back to editing in Lightroom. And it’s not just a matter of extra space: you will also need to spend extra money.
But let’s look at some options.
Iridient

My favourite one is Iridient X-Transformer (link). It has been created for the specific purpose of handling Fujifilm RAW files. And it does the job exceptionally well. In a nutshell, it uses a process called demosaicing to transform the camera sensor’s X-Trans colour filter information and produce a full-colour RGB image.
There are plenty of tests around, so I’m not going to digress. This is the best solution to fix the problematic relationship between Fujifilm RAW files and Adobe Lightroom (as of today).
It forces you to buy another software ($36 at the time of writing) and to find more disk space, as it creates a separate DNG file. But at least this one is compressed (lossless).
CaptureOne
CaptureOne is a complete alternative to Lightroom. For most people, it does a much better job at handling Fujifilm RAW files (even better after version 20) and can be used alongside it. But to buy a full suite of tools only to fix one issue is frankly overkill. And while I would recommend having a go at CaptureOne as a complete package for a lot of its cool features (including colour management, layers and a partnership with Fujifilm that guarantees adherence to the film simulations), this is not the purpose of this article.
I want to find ways to make Lightroom work effectively.
Others
For completeness of information, there is also a free CaptureOne Express Fujifilm Edition, but it lacks too many features (i.e. colour grading or layers) to be any useful.
Luminar and Affinity Photo are good apps but don’t address this specific issue.
DxO PhotoLab doesn’t even support Fujifilm files (update Jan 2022: starting from version 5, DxO has now introduced Fujifilm support, and it looks like it does the job nicely).
On1 Raw has Fujifilm support, but it seems to be the worst of the pack by far.
A few experiments with the Sharpening panel
I went through several experiments to get to the solution I’m adopting these days.
There are 4 sliders in the Sharpening panel, but Detail is the one I think is more interesting here.
The way the Detail slider works in Lightroom can be summed up this way:
– when the slider is at 0, it is the equivalent of the Unsharp Mask filter in Photoshop
– when the slider is at 100, it is the equivalent of a full Deconvolution approach
Unsharp Mask works by finding the edges of every element in the image and ‘sharpening’ them, without increasing noise. It basically enhances the contrast between adjacent elements. We use this in Photoshop as a form of Creative Sharpening.
Deconvolution is a form of sharpening designed to offset the RAW softness caused by camera and lens limitations. It uses very complicated maths and assumptions to help restore detail. It is, in theory, a more refined approach than Unsharp Mask, and it is often part of Capture Sharpening.
Knowing that, my original idea was always to rely on Deconvolution. Because of how it works, I also knew it was best to keep the Radius at a minimum to enhance the micro contrast in the overall image (nerdy stuff again).
So, for quite some time, my default settings for the Sharpening panel in Lightroom were as follows:
Amount: 44 (to adjust per image)
Radius: 0.5 (the minimum)
Detail: 100 (full deconvolution)
Masking: 55 (to adjust per image)
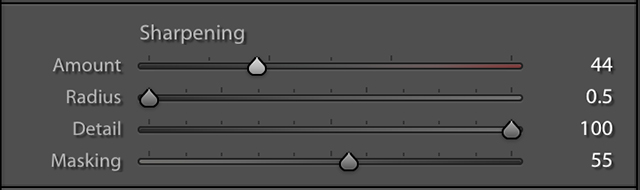
I would then adjust Amount and Masking according to the image, keeping Radius and Detail to those fixed values.
Everything seemed to work very well when sharing photos on Instagram or online. But it was a whole different story when I started selling large prints.
The flaw
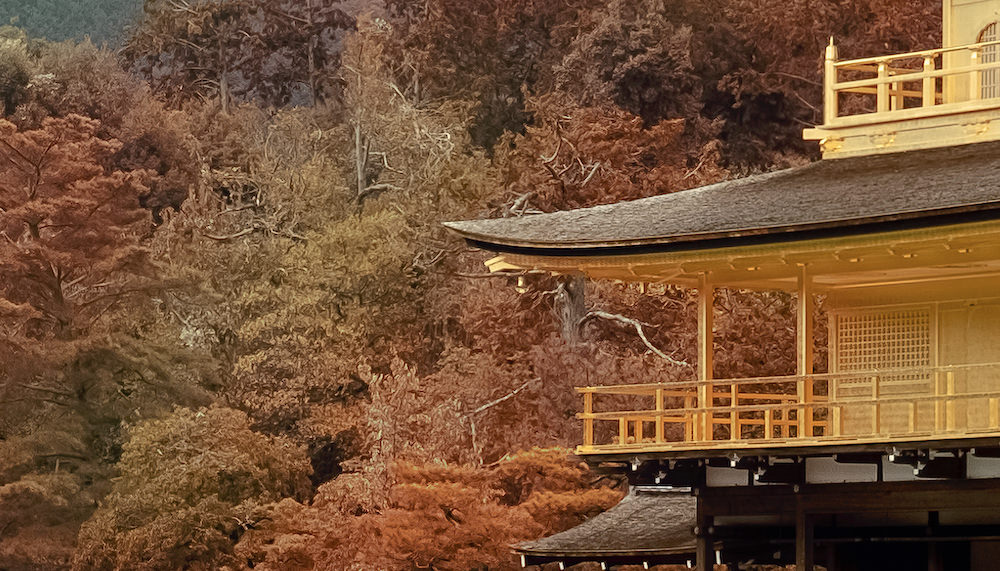
When I tried to prepare for print my Aerochrome version of the Golden Temple in Kyoto, I noticed things were not going as expected.
This was the largest enlargement from a single photo of mine: just over 2m wide. While I had sent even larger prints to my clients, they were all made out of multiple photos stitched together. This was the first request for a large print of a single shot.
As with everything else, there are several techniques to effectively enlarge an image, but none is flawless. This time it was done with TopazLabs Gigapixel AI, because the software usually gives me a higher percentage of good results.
(update, 2022: TopazLabs has released Photo AI, which uses the same upscale engine of Gigapixel AI).
But this wasn’t looking good at all. It was a whole can of worms again.
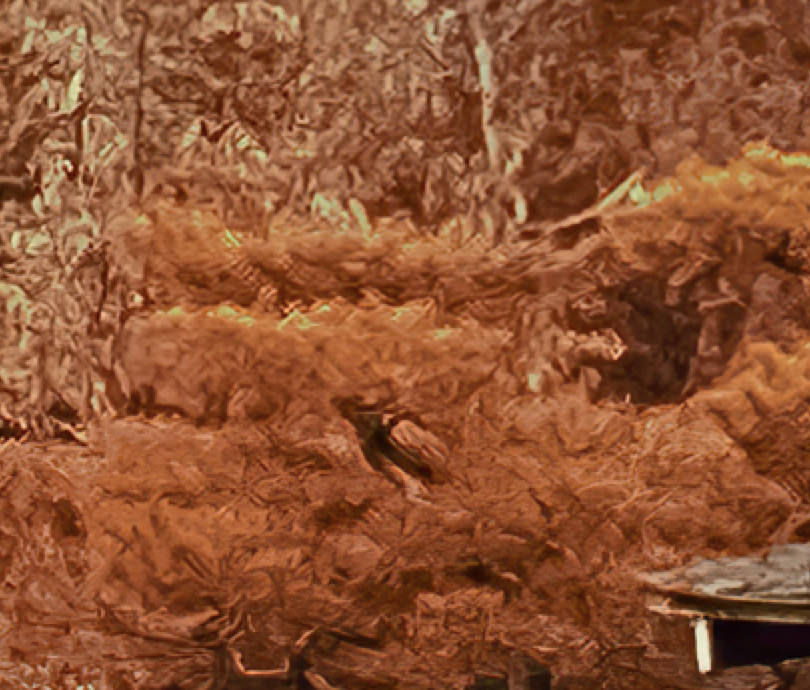
I needed to go back to my experiments and find a different approach that didn’t rely on separate software.
Of course, I can always work with something else, but I’ve been using Adobe Photoshop Lightroom since its first release, so it’s all kind of second nature to me. I can edit a lot faster with it, and it’s the software I already use to manage my collections anyway.
So, where did my experiments take me this time?
My current solution for sharpening Fujifilm RAW files in Adobe Lightroom
The exact opposite route. Detail to 0.
Now, the result still varies from image to image and can still produce some artefacts but a lot less noticeable (in my tests). The overall result looks a tad softer than the previous method (see below), hence why I first discarded it. But when looking at the image at 100%, the quality is far superior, and you can still apply some local sharpening afterwards to enhance your subject.
My new default settings upon importing my photos in Lightroom are as follows:
Amount: 97 (to adjust per image)
Radius: 1.7 (to adjust, but OK most times)
Detail: 0 (full Unsharp Mask)
Masking: 82 (to adjust, depending on overall noise)
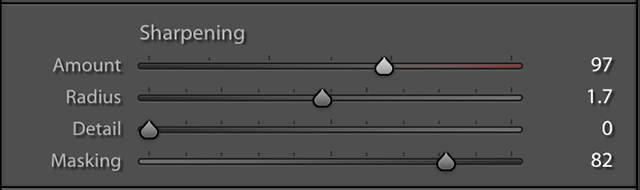
As I mentioned further above, they are fairly different from the previous ones because of how the Detail slider behaves. Now I can increase the Radius for a smoother effect, and the Amount to increase the contrast between elements. Again, you need to then play with Masking to decide how much effect you want to apply.
By the way, press the ALT/Option key when you use the Masking slider to see where it is applied (it will be in the white areas… you’ll see).
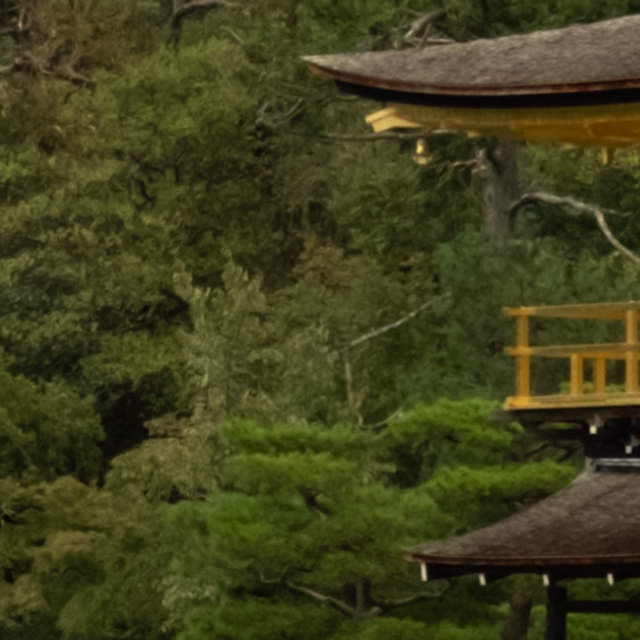
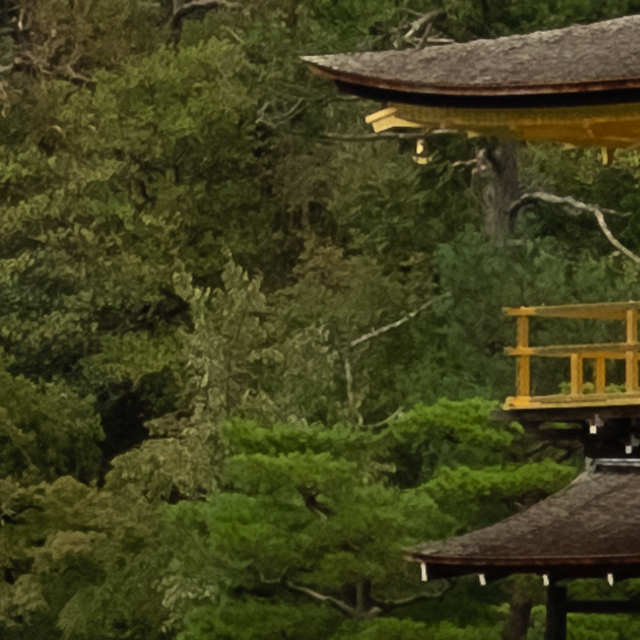
Here’s a new comparison. Now, this is enlarged 400%. In most cases, you’ll never look at pixels this close. But if you enlarge an image for a print, this is when it starts to matter.
Again, I use TopazLabs Gigapixel AI for this specific need.
RAW Sharpening with the old settings

Drag
RAW Sharpening with the new settings
Drag
Sharpening applied, Old vs New
Drag
It may look soft but don’t worry. A) this is a significant enlargement and B) you still have to apply Output Sharpening anyway before printing or exporting for optimal results for the web or for the paper you use.
Bye-bye worms! I printed a test of a small portion of the photo at 100% on an A4, and there are no artefacts in sight. Considering a large print will be seen from a few feet away anyway, I’m pleased with the result.
As I said, it’s unlikely you’ll see pixels so close. And if you export for social media, the perception of sharpness you get from the first method might even be preferable (hence why it fooled me). It may even look better to you in these examples!
Print Deals
Since we’re talking about printing images, here is something you may like… 50% discount on your prints! Courtesy of my print lab of choice :)
Here in London, I always print my photos from The Print Space lab. In fact, they’re the ones responsible for all the prints in my shop! The print quality is superb and, conveniently, they deliver worldwide in safe and protective packages.
There are several deals online which help cut print costs. You can google them, but it’s easier if you visit this link https://www.wethrift.com/the-print-space, see more info on this page or just use my coupon code 90NXK6W for 50% off.
Conclusion
I suppose this will always be a work in progress until Adobe introduces a native solution that doesn’t require creating a new DNG file. Dear Adobe, plenty are switching to CaptureOne 20 because of this long-standing issue, so maybe do it ASAP?
But as of now, this is my optimal solution after long and tedious tests, so I’ll keep adopting it. I purchased both Iridient X-Transformer and CaptureOne, therefore I can always resort to these two if Lightroom isn’t good enough, but I rather keep everything in one place.
update 2023: Adobe Lightroom is now in a much better place when it comes to sharpening Fujifilm RAW images. It’s not embedded in the import phase and applied automatically like CaptureOne does, but the Enhance feature works much much better. Most photographers swear that the problem is now gone. And in the vast majority of cases, that is true. But when you print very large images, like my example above, you can still see some artifacts. I will eventually write a new article on the matter, for sure.
Unlock your sharpening mastery with my exclusive Fujifilm RAW sharpening presets. Download your free set now!
I created a simple Lightroom preset to apply this Capture Sharpening fix automatically when importing my images. If you want to give it a try, you can download it here (for Lightroom 7.3 and all later versions):
Lightroom Presets – Fujifilm Capture Sharpening Default 1Kb 674 downloads
Tweaks the Sharpening sliders in Adobe Photoshop Lightroom to eradicate the “worms”…If you need something more advanced, with different types of sharpening to cater for most needs, you can purchase the Sharpening presets pack from my store for a little more than a coffee (London prices).
To install the presets, unzip the file, open Lightroom, and click on the + symbol above the Presets panel in Develop mode. Click on Import Presets and find the one you just unpacked. And voilà.
This is a good starting point and works well in most cases. It may need some further tweaking because every image is unique, and you may need to apply some noise reduction with high ISO photos. But so far, so good.
I felt the need to go deep in detail with this topic while preparing my Photoshop Lightroom Classic course (due later in 2021). It will be one of the perks available to my Patreons, with dedicated online lessons and videos and maybe an eBook in my store. But this is such a key discussion with Fujifilm photographers that I thought it needed its own standalone article. Hope it helps!
And if you would like to know how I became a Fujifilm photographer myself, I wrote the story here and here.
Cheers!


4 comments
Have you tried applying Photo > Enhance > Raw Details and then doing the above on the resulting DNG file?
Hey John, good question. Enhance Details is a good addition to the tools we can use to better our Fuji RAW files but it still works on a photo that had already been imported. And it does more to work around the RAW softness than it does to fix the specific issue. Therefore, if we don’t apply any setting upon importing it still takes the default sharpening values that cause the worms.
The result is certainly better and makes for a very usable file, but you can still see the issue if you upscale the image for a large print. You should be able to get away with it if you print to its native size (roughly A3 size at 300dpi).
Having said that, I experiment with it every time there is a major update in Lightroom so I’ll keep trying.
Fabien! I also find this solution better than the “Detail 100”. But I regularly also add 10 to 15 of Texture as default which I find improves the sense of sharpeness in a nice way.
Stefan! :)
I do play a little with Texture as well now, but I don’t normally go over 5 upon importing the images. Then it depends on how I use them: for example if I post on Instagram which has low resolution then I can crank everything up and nobody will notice artifacts. But if I need to print a photo I apply more subtle changes and leave Texture between 0 and 5 as per import because when you tell Lightroom to sharpen for print on export it can produce strange effects. Nothing too noticeable if you’re not a pixel-peeper but I don’t take chances if the print goes to someone who purchased it :)
Wish a Merry Xmas mate, hope it’s all good with you